Seven Ways Light Turns a Portrait Into a Legacy
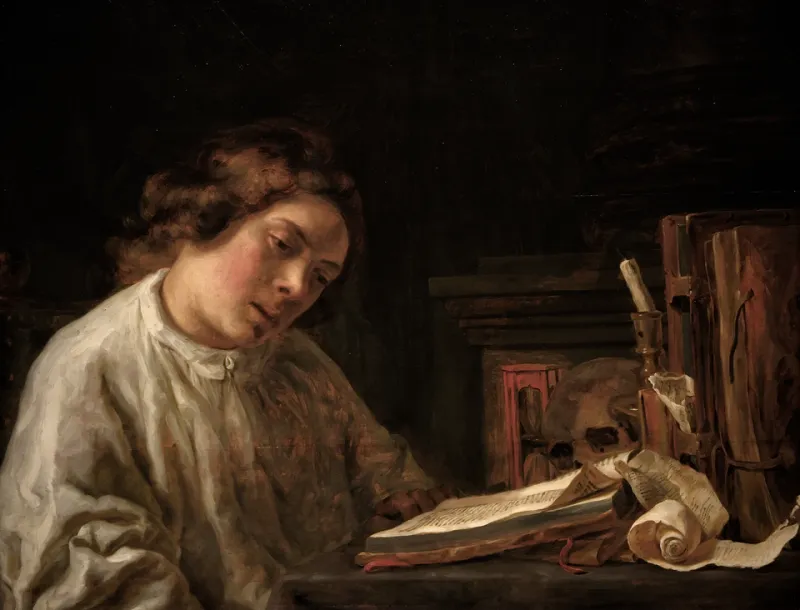
Photo: Sebastian Herndlhofer, CC BY-SA 4.0, via Wikimedia Commons
Walk into any museum in America — the Met, the Art Institute of Chicago, the National Portrait Gallery in Washington — and you will notice something immediately about the portraits that stop you in your tracks. They are not lit evenly. They are lit deliberately. Shadow and light conspire to give the subject weight, mystery, and presence. That is the standard we hold every session at Majestic Imagery to, and in this piece, we are pulling back the curtain on the seven lighting setups that make it possible.
1. Rembrandt Lighting: The Old Master's Signature
Named for the Dutch painter whose canvases defined dramatic portraiture, Rembrandt lighting places the key light at roughly 45 degrees to the subject and slightly above eye level, producing a small triangle of light on the shadowed cheek. The result is sculptural, timeless, and quietly powerful.
How to replicate it: Position your key light at a 45-degree angle and 45-degree elevation, then watch the shadow under the nose — it should connect with the cheek shadow to form that signature triangle. A single softbox at low power is enough. In a home studio, a window works beautifully on an overcast day.
2. Split Lighting: Drama in Its Purest Form
Split the face down the middle — half illuminated, half in shadow — and you have the most theatrical setup in the portrait photographer's arsenal. It suits athletes, musicians, and anyone whose story involves tension or transformation. We have used it for executive portraits in New York boardrooms and for artist headshots in Nashville studios alike.
How to replicate it: Place the light exactly 90 degrees to the subject's face. Meter for the lit side and let the shadow side fall off completely. A gridded modifier keeps the light from spilling and preserves the contrast.
3. Butterfly Lighting: The Hollywood Glamour Play
Born on the soundstages of 1940s Los Angeles, butterfly lighting places the key light directly in front of and above the subject, casting a small butterfly-shaped shadow beneath the nose. It flatters cheekbones, elongates the face, and delivers that unmistakable silver-screen polish.
How to replicate it: Raise a beauty dish or large softbox high enough that the nose shadow is short and symmetrical. Add a reflector below the chin to fill shadows gently. Keep the subject's chin lifted slightly.
4. Low-Key Lighting: Painting With Darkness
Sometimes the most powerful statement a portrait can make is how little it shows. Low-key lighting surrounds the subject in shadow, letting a single controlled source carve their features out of the black. It is the visual equivalent of a whisper that commands a room.
How to replicate it: Work in a space you can fully darken. Use one gridded light, feather it across the subject, and set your exposure for the highlights only. Black flags or v-flats on either side keep stray light from reintroducing detail you want to sacrifice.
5. Rim Lighting: The Halo Effect
Place a light behind and above your subject, aimed back toward the camera, and their silhouette ignites. Rim lighting separates a figure from a dark background with an edge of pure light — an effect that reads as regal, almost mythic. It is a favorite for dramatic bridal portraits and athletic editorial work.
How to replicate it: Position the light behind the subject at head height or above, angled down. Use a grid or barn doors to control spill. Expose for the subject's front; the rim will blow out just enough to glow.
6. Color Gels: Cinematic Contrast in Two Hues
Teal and orange. Crimson and cyan. Gelled lights let a portrait borrow the palette of a film poster, and when done well, they transform a simple headshot into something that belongs on a billboard in Times Square. The technique pairs a warm key with a cool fill — or the reverse — for tension the eye cannot ignore.
How to replicate it: Gel one light (a deep blue works well) and aim it at the background or from behind as a rim. Keep the key neutral or warm with a quarter CTO. Shoot in RAW; gels shift white balance dramatically and you will want latitude in post.
7. Window Light, Mastered: The Location Legend
Not every legendary portrait requires a studio. A single north-facing window — a resource painters have prized for centuries — can produce soft, directional, Rembrandt-quality light anywhere in the country, from a Brooklyn loft to a ranch house in Montana.
How to replicate it: Turn off every artificial light. Seat your subject at a 45-degree angle to the window and move them closer or farther to control contrast. A black foam core board on the shadow side deepens the drama without adding equipment.
The Common Thread
Every one of these setups shares a single principle: intention. Legendary portraits are not accidents of good weather or flattering angles. They are built, deliberately, from decisions about where light falls and where it does not. Whether you are an aspiring photographer practicing in a garage or a client curious about what happens behind the scenes of a Majestic Imagery session, the lesson is the same — light is not merely illumination. It is authorship.